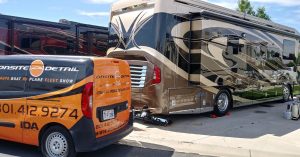
We get many phone calls every week of people wanting to know the details of the RV detail. Today I’m going to go over some of the things to keep in mind and to hopefully help you understand a few of the processes of detailing an RV. A few months ago I wrote a few blogs about the whole entire RV detail. These blogs included everything included with the RV detail; from the roof cleaning to exterior washing to the exterior waxing and interior detail.
How we price our RV Detailing Services
I am going to go over RV pricing (for our company specifically), oxidation removal, different waxing methods, and some things in between.
For RV detailing, we charge $75 per man hour. That may sound scary if you don’t understand our reasoning, but don’t let it keep you up at night. We have found through our years of experience that the hourly rate allows to provide the right service that each client wants as well as not charge overcharge for RVs in great condition and undercharge for the neglected ones. We charge hourly because we want to make sure that we keep the job as customized as possible. We want to make sure that we are doing what you want done. We don’t want to be doing stuff that you don’t want done or are not really concerned about and then charging you for it. This means if you want and its needed we can spend lots of time polishing the wheels to perfection and not worry so much about the roof or vice versa. Some customers want the interior spotless and smelling fresh while others prefer we spend our time and energy polishing away ugly oxidation on the exterior. This allows us to serve you better and help you stay within a budget (if you have one).
On occasion, there may be more than one detailer sent out on an RV detail job. If this is the case then yes, you will be paying $150 per hour. This means you will be paying the same amount to detail your RV at the rate of $75 per hour that you will at $150 per hour. At $150 an hour, you will have 2 workers on the job and will be able to get it done twice as fast.
If you have any questions regarding pricing or need an estimate give us a call or send us a text.
Oxidation Removal 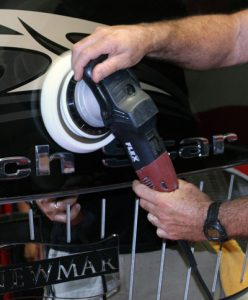
RV oxidation removal can be an extensive project but well worth endeavor. Oxidation is the white chalky substance that builds up on the exterior of the RV, typically on the gel coat or the painted areas. The bad news is that it can be quite difficult to remove but the good news it that it can be done in most cases. The sad reality with oxidation is that washing the RV will not remove much of it, even with strong cleaners and soaps. It will remove some of it (the very loose stuff) as you will be able to see the washed away oxidation on the ground. Oxidation will also be weakened after a good wash but will not be completely eliminated. This is what makes the complete removal of oxidation such an extensive process. More times than not, to completely remove oxidation, you will need to have it done with a buffer or polisher and the proper polish pad and compound or polish.
Although it will take more time to remove oxidation, it is something you DO want to keep an eye on and will pay off in the long run. If you let oxidation get the better of your RV or trailer, believe it or not, it will actually diminish the quality of the gel coat or paint. Areas that are in the sun a lot will be most affected. Areas that have a lot of exposure to weather and the elements are also subject to oxidation. If that happens it will not only make your RV look ugly and gross it will hurt the resale value of your RV as well. We don’t want that to happen so be sure to keep it a priority to protect the RV and keep up on it.
Protecting the RV
I will now go over a few different methods of protecting the RV. After a good wash and cleaning it is highly recommended to get a wax, sealant or ceramic coating put on. There are a few different ways of protecting that are effective and, in my opinion, will work the best with various situations and on various budgets.
The first method is a spray sealant. This is the quickest application and will take the least amount of time to accomplish. It does not involve a “wax-off” step which will cut down the amount of waxing time that it could take by a pretty significant amount. Under ideal conditions, this type of sealant can and should last anywhere from 3 to 6 months. In extreme weather conditions this wax may only last about 2 months. This is ideal for RVs in already in good condition that are kept up and taken care of regularly.
Another method of protection is the wax or sealant that will be applied with a buffer or polisher. This is the protection method that does involve the “wax-on, wax-off” technique. This wax or sealant will most likely come in a paste or liquid paste form and will need to be applied with a foam or micro-fiber pad. This type of protection will easily add hours to the amount of time it takes to apply it. Under normal conditions this type of wax or sealant should last anywhere from 4 to 8 months. Typically this method is recommended once a year with an optional spray sealant in between services to make sure the paint or gel coat of the RV or trailer is being protected. This method of protecting will be more expensive but will also be better for the exterior and will also help hold up the value of the RV.
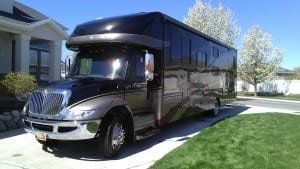
The top of the line or best protection for any RV surface will be a ceramic coating. This is not something that we would recommend to everyone. This is best for RVs that are new or have full exterior detailing done before installation. A ceramic coating is a durable clear protection that is resistant to heat, chemicals, UV Damage/oxidation and corrosion. It creates a solid barrier that is hydrophobic and will help make maintenance easier and protect the RV for years. Proper care is needed to maintain the coating but its protective qualities cannot be matched. The cost for having this installed is going to be significantly more than a wax or sealant but the protection it provides is way more valuable.
Now for my favorite method of protection. This is the one that I’ve recommended to many customers and involves a more efficient method of allowing for the best method of protection and not have to break the bank to make sure the areas that need more protection get the protection. It does involve two methods of protecting. We will start with the machine waxing/sealing that involves the paste wax and the buffer. The ONLY area that will be done with this method is the front of the RV or the nose unless otherwise desired. This area of the RV is the area that takes the majority of the beating from the weather and travel. Now that leaves the rest of the RV. The rest of the RV is done with the spray sealant. This method of protection is my favorite to recommend to those on a specific budget or as a maintenance service.
The spring, summer and fall are the most popular times of year that we see RVs. Constantly checking the exterior of your RV will help you to keep up with the regular cleanings and ensure any major problems can be avoided or corrected. The longer you let it go without taking proper care the more expensive it can get to return it to the nice glossy finish.
Hopefully you have learned a little more about RV detailing today. Until next time! Safe Travels!
by Andy Stallings, CD, Operations Manager, Onsite Detail