So a few weeks ago, I wrote an article about washing the roof of an RV and why it is important to start with the roof. You do not have to wash the roof when you wash an RV but it is highly recommended. Today, I’m going to explain some pointers on the rest of the RV wash.
If you’ve washed the roof well, you may see some streaks that have run down from the roof. This is okay and it is normal. There will be dirt and other contaminants in the streaks and they may also appear to have a white coloration to them. This is also normal. The white will most commonly be from oxidation that could’ve been washed off from the roof. (If your roof is rubber, which is the most common material found on RV roofs, it is recommended to treat the roof with a rubber sealant to prevent further oxidation. If it is not rubber, you will still want to put some form of wax or sealant on the roof. Also, doing your best to protect the roof from the consistent and direct sunlight will help).
Before the RV Wash
As you did with the roof, check all the windows inside the RV to make sure they are all closed before you start washing the RV. You can start wherever you want to. Personally, I preferred to start in the most dirty of places on the RV. Most typically, that will be the front area of the RV. The front of an RV will be about 50% window and 100% bugs… If the RV has been driven a lot and cleaned…not a lot, the front of the RV will most likely be plastered with bugs and any other souvenirs you may have picked up from the road. Having a good bug remover will help you in this process. If you do not have a bug remover, degreaser will work as well. Make sure that any chemicals you use are properly-diluted and automobile safe. You will also want to have a soap bucket with PH balanced automobile soap and an extendable scrub brush or wash mitt.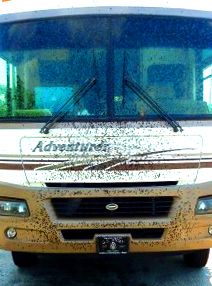
Beginning the RV Wash
To begin, spray a generous amount of bug remover (or degreaser) on the area (sometimes it may be necessary to wet the surface first). In my experience, it works best to agitate the product a little. To do so, spray a small amount of water on the surface. It works best with a pressure washer. After agitating, take the scrub brush and scrub the desired area. In some cases you may need a ladder to reach the very top of the window. If this is the case, be very careful when needing to ascend and work on the ladder. Between the pressure washer and the scrubbing, keeping your balance could become a problem so be extremely careful. Don’t be shy when it comes to the scrubbing portion. Dried on bug guts can be stubborn and will want to continue joining you on your travels. Some old sayings that come to mind are-get after it, put your back into it, a job worth doing is a job worth doing well. Fill in the blank and take your pick. A lot of jobs in detailing will depend a lot on properly using the right chemicals, tools and techniques. I may have just revealed the Pandora’s Box of detailing. Most of detailing is proper use of chemicals, tools and techniques. There are a couple times when using a little bit of elbow grease comes in handy though. Scrubbing the front of an RV is one of those times. Don’t feel bad if you have to re-scrub after rinsing. Just repeat the process and focus on areas that need it.
Doing the RV Wash in sections
Washing the rest of the RV should be much easier after the roof and the front are completed. The most effective way to proceed is to pick a side from the front and spray about 5 to 6 feet in. The easiest way that I have found it to pick a spot on the side of an RV to stop at. It can be a storage compartment, a window, a tire well, a vent, etc. Whichever one comes first after 5 feet or so. After spraying said area, scrub the area well and then rinse it off. Continue down the sides of the RV. Remember to keep the areas of work small. If you are using hard water, you may want to do your best to chamois off the RV as best as you can. If you are using soft water, after your final rinse, you will be able to let it air dry with no water spots. You may need to go back and clean the windows with a window cleaner as well. After you have gone all the way around the RV the next and final area that you will want to put some time into are the wheels/tires.
RV Wheels
Tires and wheels on RVs should be pretty easy to clean, for the most part. Most of the time, the tires and rims will clean off pretty good with a degreaser. Most of the wheels that you will see on many newer RVs will be made of aluminum. If this is the case, you will want to avoid using acid based wheel cleaners. Acid will dull the aluminum and can etch it or leave markings on it. Cleaning the wheels with car soap and a soft bristled brush will clean the wheels well. If you want to take it a step further as far as polishing the wheels, you can get some aluminum polish with some fine grade steel wool or use other polishing tools. Make sure to test an area to make sure it will do what you want it to before proceeding to do the entire wheel. Make sure that the steel wool is automobile safe and at least a 000 grade or 00 grade. This will insure the highest gloss possible. 0000 grade is good to use as well. Just be sure to test them on a spot before doing the entire wheel. If you have any tire dressing that you would like to apply to the tires you may. Tire dressing will protect the tire from the elements. It will also condition the rubber to help the overall health of the tire.
Final Touches of an RV Wash
You have now completed washing an RV. If you desire (you’ll need a glass cleaner and a ladder), doing the windows can be an option. You should also just go back and double check and touch up any spots missed or that may still be dripping. Believe it or not, for the full service on the RV you are not done yet. As with cars, RVs will also require a coat of wax or sealant occasionally. Whether you are getting ready to hit the road or are getting ready to put the RV away for the winter. It is wise to think about protection. If you ever want to have your RV professional washed and detailed give us a call or text at (801) 412-9274, and we would be more than happy to help out. Next time, I will talk about the waxing of an RV and the different methods you may use. Safe Travels!
by Andy Stallings, CD, Operations Manager, Onsite Detail