Picture yourself in this scenario…if you will. You’re driving at dusk as the sun is going down and you turn your headlights on. You’re needing to squint and possibly lean forward because you don’t feel like you can see that well. There are two possible reasons for this. Either your eyes are bad and you should get contacts or glasses for driving or you need to get your foggy headlights restored. If you can drive down the road with your brights on and you’re not offending anyone, then you need to think about restoring foggy headlights. When I say restoring, I don’t mean that you need to buy new ones. Having foggy headlights rarely means that you need to replace them. Prices to restore them can vary but are usually reasonable. More commonly than not though, it is extremely worth it when you discover the difference it makes. Both with how well they look and how much better you will be able to see at night.
I have been taught a few different methods of restoring foggy headlights and there are many ways to successfully bring back the clarity of your headlights. I will go over the method that I have discovered works best for us here at Onsite Detail and that produce the results that I have been most pleased with.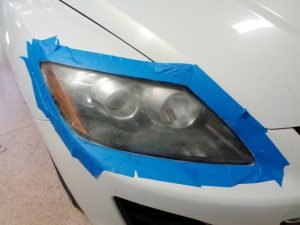
Headlight Restoration Prep Work
Before restoring foggy headlights, you will want to make sure that the headlights are free of any bugs, dirt, bird poop, etc. It’s important but not vital because those contaminants will usually be the first and easiest things to come off but personally I don’t want those things to contaminate the sanding and/or buffing pads that I will be using on the headlights. That’s why I will clean them off and decontaminate them before I begin the headlight clarification process.
In most instances and depending on your experience and also what products will be used, you will want to tape off around the edges of the headlight, especially in areas where rubber trim or paint sits close. You will want to apply the tape to the paint and you will want to make sure you are using masking or painters tape as to not cause potential damage to those areas from overly sticky adhesives. You will want to do this for a couple reasons. The first and most important reason is you will want to protect the paint of the areas that are surrounding the headlight. If you are wet sanding the headlights, you will not want to have a slip of hand (or buffer) and get the paint. In most cases if this happens it is correctable but having the headlight taped off will decrease the chances of hitting the paint and damaging it dramatically. The other reason is just to isolate the area you are working on.
The other product you will want to have on hand is a showroom shine or something to keep the headlight wet and lubricated. If you’re going to be wet sanding the headlight, you will want to make sure that you keep the headlight wet. This will keep the sanding pad from getting too hot and also soften the contaminants on the headlight to make them easier to remove. Sidenote: If you have someone else there have them spray the headlight while you are wet sanding to make it a little easier. If someone else isn’t there, be sure to stop periodically to re-spray the headlight.
There are a couple different sizes of pads you can use and you will want to make sure you have the proper backing plates. If you have foam backing plates those will help to conform to the curves and edges of the headlight.
Each step will take 3 to 5 mins on each headlight. The pads for wet sanding you will want to have on hand is a 1500 grit, either a 3000 or 5000 grit, and a finishing foam pad. You will want to make sure that the pads are safe for wet sanding.
The Headlight Restoration Process
To begin, spray a generous amount of showroom shine onto the headlight and begin with the 1500 pad. If I were to describe the amount of pressure to apply to cooking steak I would say that the amount of pressure would be medium to medium-well. You can laugh at that analogy but when you really think about it, it actually makes a lot of sense. That and I kind of want steak, but I digress.
As I said before, you will want to make sure that you keep the headlight wet. Without wiping off the headlight, spray more of the showroom shine and continue making sure to evenly wet sand every area of the headlight. When finished with this step, you will want to wipe off the headlight with a clean microfiber rag. There is a good chance that the headlight will have a foggy look to it. Do not panic, this is normal. This is where the next step happens.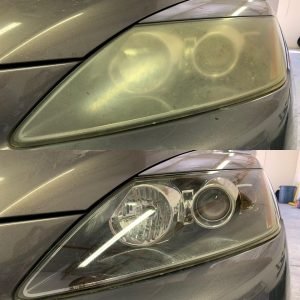
You will replace the 1500 grit pad with the 3000 or 5000 grit wet sanding pad. Sometimes depending how bad the headlights were to begin with. If they were really bad, you can add a step by attaching the 5000 grit pad and going through the same process that I just explained. Remembering once again, to keep spraying the headlight with the showroom shine. Of course going through the same process with the 3000 grit pad. After wiping off the showroom shine from headlight after this step you will notice that the headlight will be very close to what many would describe as “crystal clear”.
The Finishing Step
The final step that you will want to do is to put on the finishing pad and grab some sort of a polish that is infused with a wax or sealant. This will insure that the headlight clearness will last longer and preserve what you just worked so hard to accomplish. For the polish, you do not need to keep the headlight wet but it is a smart idea to give the finishing pad a spray or two of the showroom shine. You will not need a lot of product on the pad. You don’t need to do this step twice but I like to do it for good measure. With a clean dry rag, wipe off the excess and you will discover the brand new headlight that you will be excited to see the difference at night with. Sounds like something weird to be excited about but I promise you will be. If you want go ahead and do an exterior detail as well to get the whole car up to par with the newly restored headlights. I hope you learned something about restoring foggy headlights. It doesn’t cost much and you will be that much safer driving in the dark. Safe Travels!
by Andy Stallings, CD, Operations Manager, Onsite Detail